11.2 API Security
# Security
Security for Web Apps is a broad topic with lots to learn. This week we will be talking about a number of the elements that you should consider when designing the security for your app.
Best Practice
👍 Never trust data that is coming from the user. Whether it is something written in the querystring or a form input, always do at least basic validation on that text.
👍 Never store passwords in the browser.
👍 Never send passwords from the server to the client.
# Cookies
Cookies have been available as Strings that get created and passed with HTTP Requests and Responses since the early days of the web. In the Requests and Responses, they are sent as a Header value.
Practically every request that the browser makes for any file will have the cookie header sent along with the request.
In the browser they are stored inside document.cookie. We will use document.cookie to both get and set the values of cookies.
The format of the cookie string is like this:
'key=value;path=/;domain=localhost;max-age=30000;secure;samesite';
Just like localStorage there is a key and a value. The value must be URL encoded, just like values you put in the queryString.
# Path
Be default, cookies apply to the root folder of your website. However we can add to this path value to restrict the cookies to a smaller part of our website.
# Domain
By default, the domain value will be the domain of the HTML file. However, we can restrict it further to a specific subdomain if we want.
# Max-Age
The max-age part of the cookie String will be the number of seconds that the cookie is to be considered valid.
# Secure
If the secure value exists it means the cookie can only be accessed or set over https.
# Same-site
If the same-site value exists then the cookie is only to be sent with requests for files that are going to the same domain as the original HTML file.
MDN Reference for document.cookie (opens new window)
# Headers
The full notes about how to work with Headers are back in Module 10.1.
Headers are included as a topic under security because you will often have to include your API Key as a header. It depends on who designed the API. They might want the API Key in the querystring. They might want it as a Header entry. They might want a value in the querystring plus a header entry.
When you start to work with JSON Web Tokens (JWT), you will be passing a JSON String that has been encoded as a base-64 string through a header called Authentication. You will also be reading the
header when it gets sent from the server.
The Authentication server is also used, less commonly, for other types of authorization methods like username-password.
# CSP
There is a meta tag that you should put into ALL your websites and web apps and hybrid apps. It is a security feature to protect your users.
It has the http-equiv attribute set to Content-Security-Policy and then a content attribute with all the possible values of where the browser is allowed to load different types of resources
from.
<meta http-equiv="Content-Security-Policy" content="default-src https: ;" />
The value inside content is broken up into different categories like default-src, img-src, style-src, font-src, media-src, and connect-src. After each category name you put one or more
values for allowed sources for that type of content. After each source list you put a semi-colon.
The http-equiv attribute means that this is actually a header that could be sent from the server too.
See the CSP website for the full list of categories and values. CSP website official reference (opens new window)
You should put this meta tag into EVERY webpage you build.
MDN CSP reference (opens new window)
OWASP CSP cheatsheet (opens new window)
Mozilla Hacks guide to CSP (opens new window)
When things go wrong with your Content-Security-Policy you will see notifications in the JavaScript console in the browser.
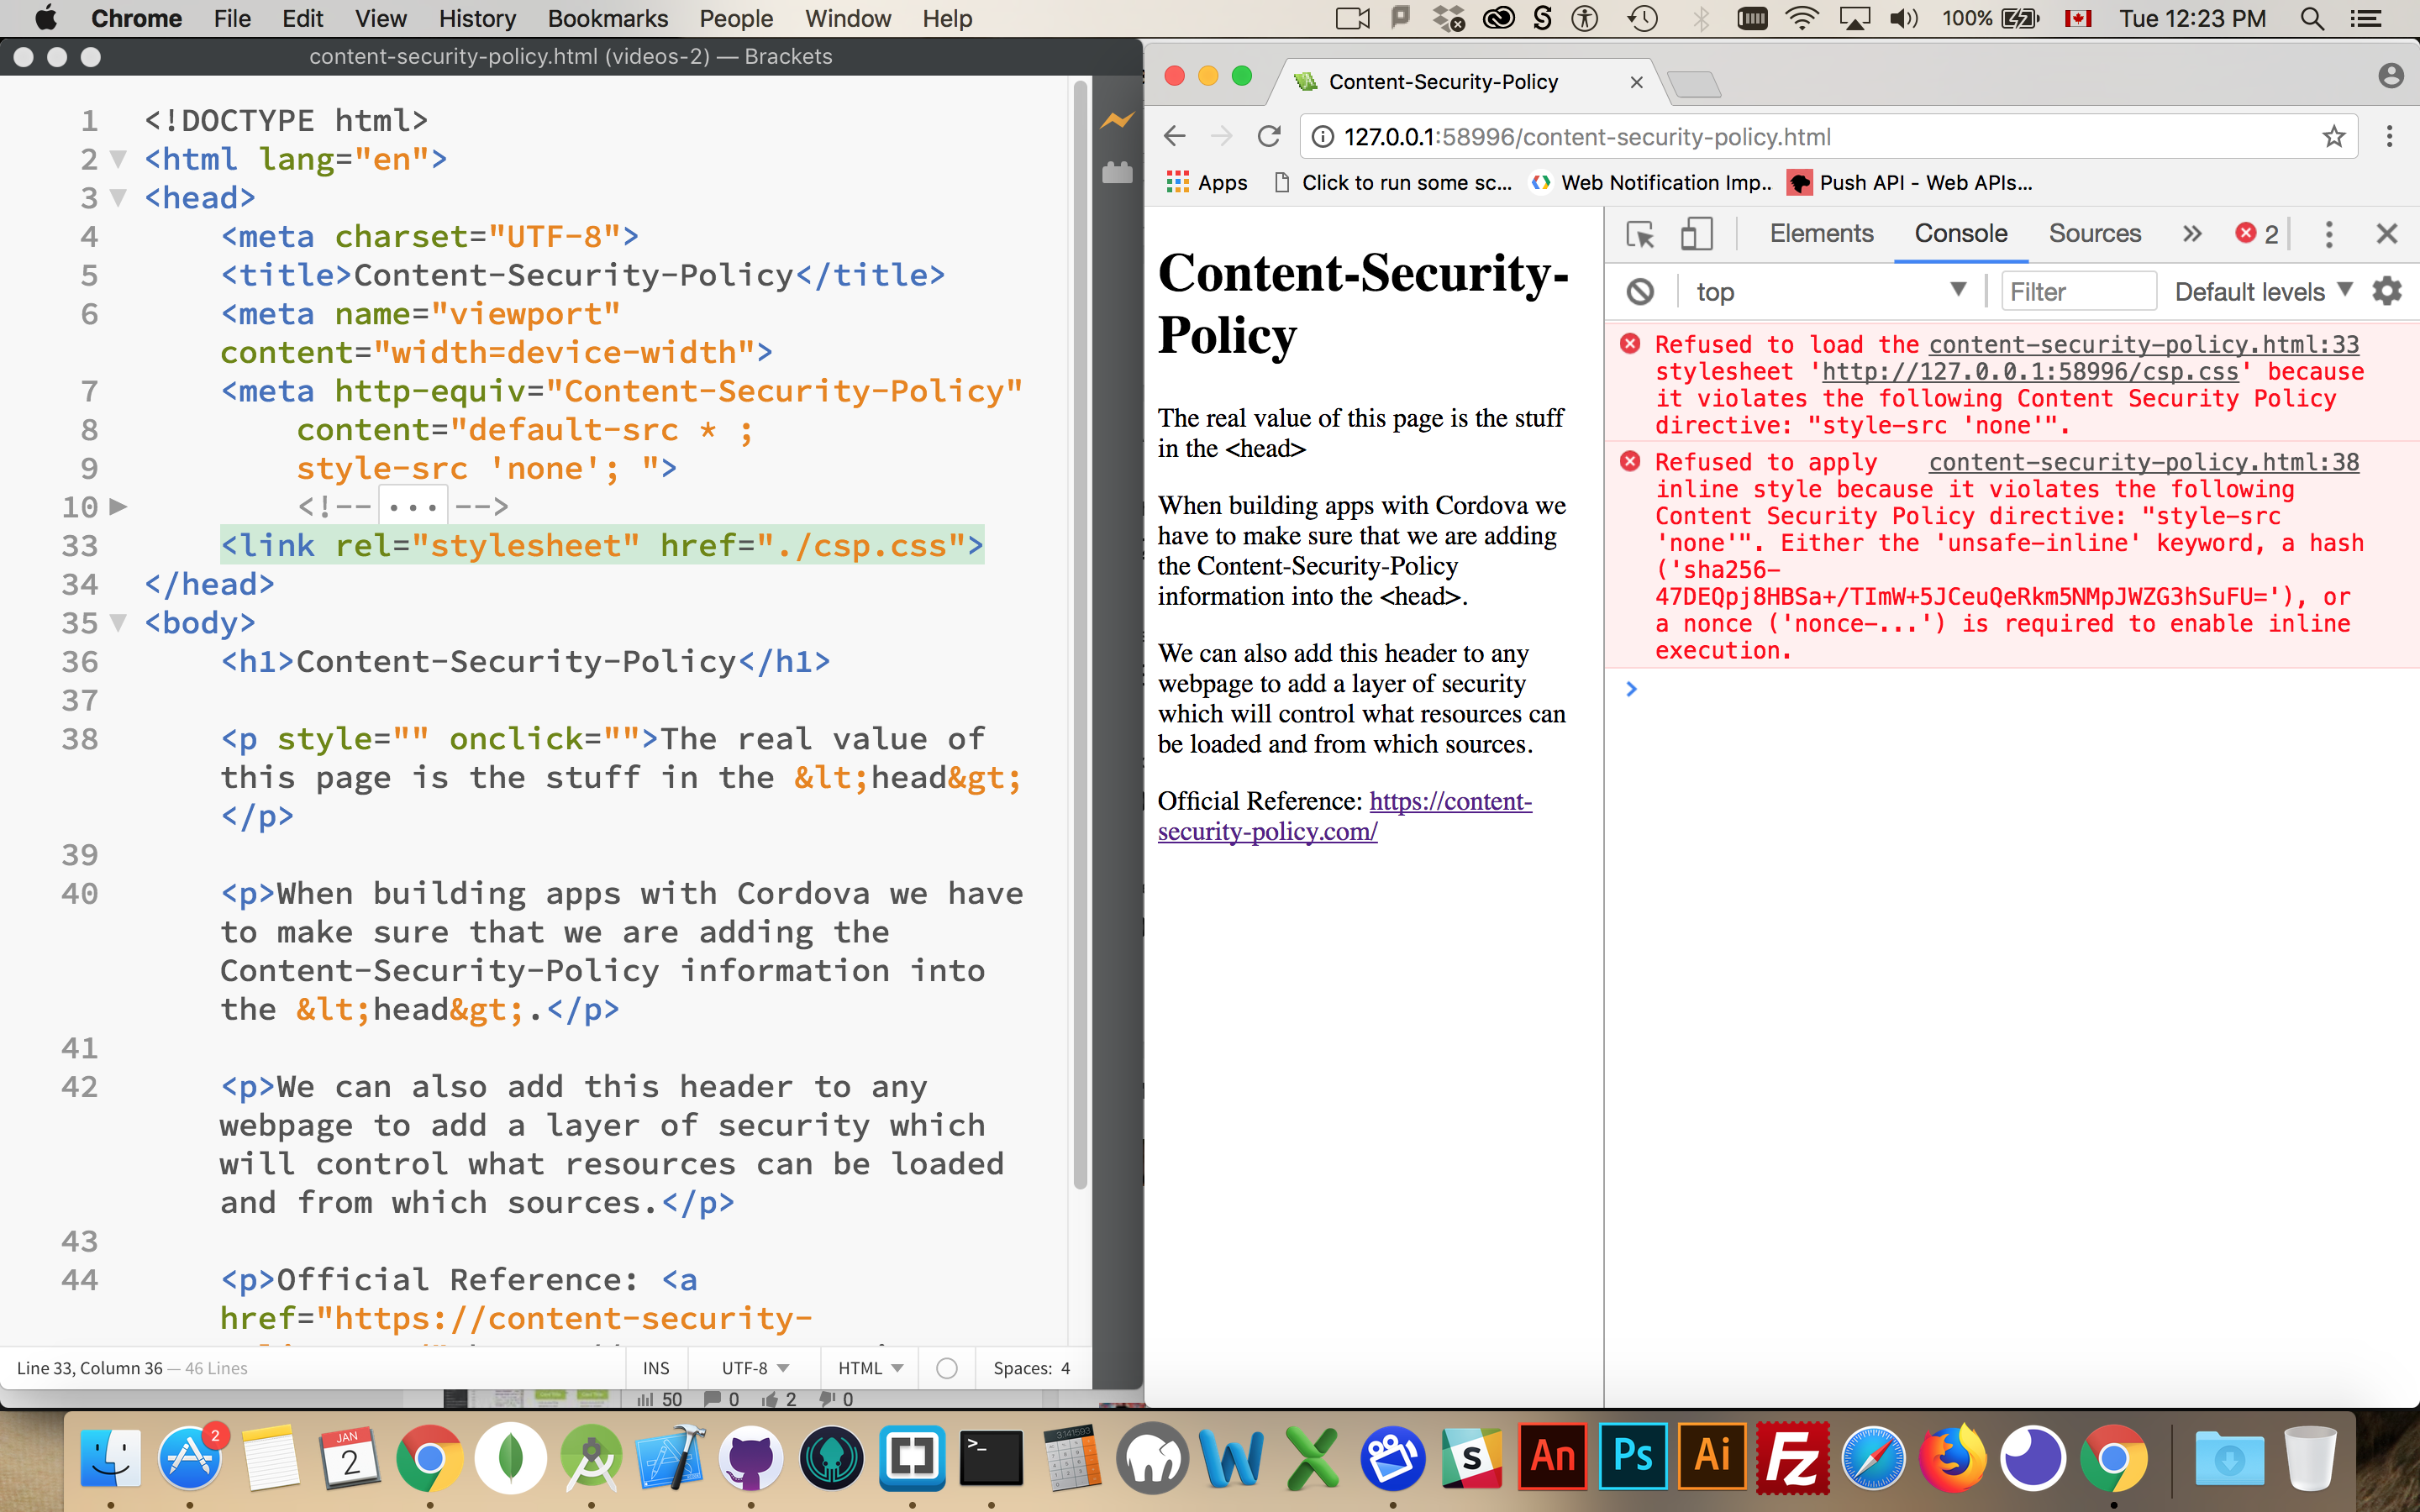
In this screenshot it is saying that it cannot load the stylesheet because the style-src is set to "none".
When you run into problems with the CSP, you should just respond to each error separately by adding a new category or updating a category to include a specific location. While you can just put everything into default and accept anything this defeats the purpose and provides no security for your users.
# Using the Script integrity Attribute
With script tags, we can add an integrity attribute which helps protect our users further. This attribute value also needs to be added to your CSP tag.
# CORS
CORS stands for Cross-Origin Resource Sharing. It refers to the process by which the browser can make HTTP Requests to load an HTML file from one domain and then other things like images, fonts, stylesheets, and scripts from different domains.
If the browser is making the request based on what it read in an HTML or CSS file then this can be done freely.
If the cross-domain request is coming from some JavaScript code then there are restrictions in place.
JavaScript can use the Fetch API or XMLHttpRequestobjects to make requests for resources like XML, JSON, text, images, stylesheets, fonts, videos, audio files, etc. However, we have to follow a
restrictive list of rules to be able to make those requests.
# Headers
When you configure the fetch( ) call with the Request and Headers objects to request a resource on a different server the only predefined headers that can be set are: Accept, Content-Type,
Accept-Language, and Content-Language. No other headers can be altered for a CORS request. You can add your own custom headers like X-Steve-Is-Awesome without impacting CORS.
Accept tells the server what types of files you are willing to accept as a response. Content-type tells the server what type of file you are sending. The only three values allowed for
Content-Type are text/plain, multipart/form-data, or x-www-form-urlencoded.
# Mode
When using the Fetch API we can actually set the CORS mode for the request. Basically we are going to tell the server that we do or do not want to make a cross-domain request.
Inside our Request options we define the mode like this:
let options = {
  method: 'GET',
  mode: 'cors',
};
2
3
4
The mode can be "cors", "same-origin", or "no-cors". If we set it to "cors" then we are telling the browser to look for the proper permissions to come back from the remote webserver telling
us that CORS is allowed. If we set it to "same-origin" then we are telling the browser that it should prevent the JavaScript from making calls to any domain except the one where the HTML came from.
"no-cors" tries to make an opaque attempt to get external sources but does not currently work within the global scope of the page.
# Behind the Scenes
When you make a CORS AJAX call from your JavaScript code there are actually two requests being made. An initial request called a pre-flight request gets sent from the browser to the server. This
request includes a header providing the domain from which the request is being made.
For the communication between the server and the browser to finish properly, the server needs to respond to the initial preflight request with a Response that includes a header called
Access-Control-Allow-Origin. The value for this header must match exactly your URL or be set to a wildcard.
With Apache as your webserver, we can create a settings file called .htaccess and inside that file add this line:
Header set Access-Control-Allow-Origin "*"
This will create the required header to allow for cross origin requests.
The .htaccess file must be in the folder or a parent folder for the resource being requested.
Even if you are not using Apache as your web server, the Access-Control-Allow-Origin header still needs to be sent from the server to the client.
There is also an Access-Control-Allow-Headers header that can hold a list of the headers which are allowed to be sent from the browser to the server when the actual full HTTP Request is sent (after
the pre-flight request).
The Access-Control-Allow-Credentials header holds a true value or is omitted. If the Request.credentials property is set to include, then this header must be set to true or the browser will
not be allowed to access the full Response if cookies, authorization headers, or TLS client certificates are included.
The Access-Control-Allow-Methods header holds a list of allowed methods that can be used for the full request after the pre-flight request.
Access-Control-Allow-Headers MDN reference (opens new window)
# What Gets Restricted
There are actually quite a few things that can get restricted when requesting resources over CORS. For our immediate purposes, it is important to note that a webpage from edumedia.ca making a request to darksky.net would not be allowed to use the JSON data. This happens because the HTML file and the JSON file are coming from different servers and the server providing the JSON is NOT setting that Access-Control-Allow-Origin header for us.
If you set the mode to "same-origin" or "no-cors" then the request would be entirely rejected.
If you set the mode to "cors" then the request would be sent and the JSON data returned but we would not be allowed to use the data in our JavaScript.
MDN CORS reference (opens new window).
And here is a great article by Lydia Halie (opens new window) with illustrations to show how CORS restrictions work.
# Authentication and JWT
When you need to do things like pass a username and password along with a fetch request, there are a few things you can do.
The following videos will be very useful to you later on when you start using JWT in MAD9124 and need to accept tokens on the client side.
Tokens has become the most common way to authenticate with fetch and API calls. This first video explains how tokens can be passed through fetch.
This next video shows the full life cycle of JWT (JavaScript Web Tokens) on the client and server. The Server-side part of this will be discussed in detail in MAD9124.
# 2FA
An acronym that you will see occasionally when reading about web security is 2FA. It stands for Two-Factor Authentication.
It is a method for making your apps more resilient to attacks on your users. Basically, you have your app ask the user for a username and a password.
After you validate their username password combination on the server, then you send a randomly generated code to either their email or via SMS as a text message to their phone.
This way the person trying to access the site has to know the username and password AND they must possess the device and/or have access to the person's email account.
Recently, there has been more usage, of Authenticator apps. It is the authenticator app that is responsible for generating the random code and then telling both the site and the user what the code is. The user then has to enter the code and send it to the web server. The web server will validate that the code sent by the user is the same one that it got from the Authenticator.
# Web Authentication API
MDN reference for Web Authentication (opens new window)
# What to do this week
TODO Things to do before next week.
- Read all the content from
Modules 11.1, 11.2, and 12.1. - Finish working on the Hybrid Exercises