# Steps to Follow to set up a Repo for an Assignment
::: Note These are generic instructions about getting started with new repos to use in your assignments. :::
# Always Use Your Own Repo on GitHub
Whenever you work on a project you need to have a back up copy and history of your work. This is why we use Git and Github. Git is the technology we are using to manage the history and create copies or versions of our work. GitHub is the place where we store backups of our work that can be shared with others.
You always need to have your own repo on GitHub so that you have permissions to add, edit, or delete content in the repo.
Git Default Branch
We want our local default branch to match the one we are using on Github. To do this run this command.
git config --global init.defaultBranch main
# Create your OWN repo on GitHub
- Create a Private GitHub Repo called
whatever the assignment asked you to createon your GitHub account, with NO README.md file. - On the GitHub
Pagessettings for your repo, set yourmainbranch as the gh-pages branch, if needed. - On the GitHub settings for your repo, go to the
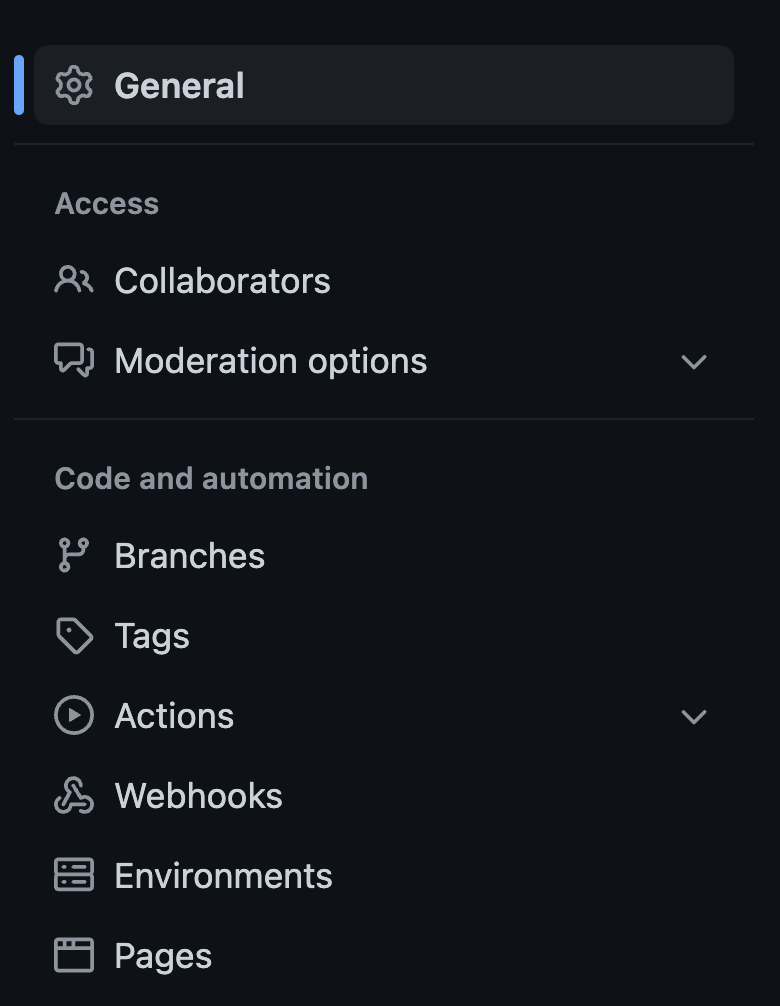
Collaboratorstab and invite your instructor to the repo as a collaborator. On GitHub, Steve's username isprof3ssorst3v3. - See the image below for the left-hand menu from GitHub on every repo's
Settingspage.
# Fork your OWN repo from an Existing Repo on Github
- If the code that you are going to start with already exists on Github then you can quickly create a copy of the other Repo as your own repo using a
forkcommand. - Visit the GitHub page with the repo that you want to copy and look for a button on the top-right called
fork. - Click the
forkbutton to create a copy of the repo that will belong to you.
# Clone an Instructor's Repo
- Sometimes you will start with a repo provided by your instructor but you might already have an empty repo on Github with the name that you want to use.
- If you do NOT have an empty repo that you want to use then you can
forkthe repo instead. - Start in Terminal (MacOS) or Command Shell (Windows) by navigating to the folder where you want to create your own copy of the repo.
- Next, you need to copy the repo on to your computer by typing the following in the Terminal:
git clone https://github.com/instructorsname/reponame.git monday
- This would copy a repo from
https://github.com/instructorsname/reponameto your computer and put it in a folder calledmonday. - If you omit the
mondayat the end then whatever the repo is called will be used as the folder name. - Make sure you change the user name and repo names to the actual ones you want to use.
- Next DELETE the
.gitfolder inside your reponame folder with the following commands (replacingmondaywith your actual folder name):
cd monday
rm -rf .git
2
- You delete the .git folder so that you can make it a repo belonging to you, not the original owner. the
forkcommand does this for you. - Now we need to turn our folder back into a Git repo on our computer and point it at the one that we created on GitHub.
git init
git remote add origin https://github.com/[YOUR USERNAME]/reponame.git
2
Use the SSH URL if you can, instead of the https one
- The
git initcommand will add the.gitfolder back and tell thegitprogram to start monitoring your folder. - Warning
- IF you did create a repo with a
README.mdfile on GitHub or you changed the repo or added files through the GitHub interface then we need to download that file before adding our own. Type this to download all files from your own repo on GitHub:
git pull -u origin main
If there was nothing new to download then the pull command will give a warning.
# Starting with Your Own Github Repo
- If you were not provided with a starter repo, and just created one of your own on GitHub then the steps are similar but simpler.
- You will need to clone your own repo from GitHub to a local folder.
- Start by navigating with Terminal (MacOS) or Command Shell (Windows) to the place where you want to create the repo.
- Next clone your repo by typing the following:
git clone https://github.com/[YOUR USERNAME]/reponame.git monday
- replace the username and reponame with your own.
mondayis the name of the folder you will be creating.- If you omit the
mondayat the end then whatever the repo is called will be used as the folder name. - finally, navigate into your repo folder.
cd monday
- Change the name of the folder to the one you created.
# Adding Starter Files
- Sometimes you will have files that are provided for your assignment, like HTML or CSS or images in a Zip file on BSLMS. These need to be copied into the repo folder and then we need to tell Git to keep track of the files.
- In your Terminal (MacOS) | Command Shell (Windows), you should be inside your
reponamefolder and type the following:
git add -A
git commit -m "first files"
git push -u origin main
2
3
originis a label that, in this case, means Github. You can have as many remote copies of your repo as you want. Each one needs a label. The convention for the first one created is the nameorigin.
# Adding A Remote BackUp Location for your Repo
If you did create an empty repo on Github to hold your project, there is an alternative to making a clone of the repo. You can create your local empty repo and then just tell it what the url of the remote repo is.
- First create your local empty repo with
git init. This will turn your current folder into a Git repo. - Whatever you have set as your default branch name will be used to create the initial branch. Typically this is called
main. - Then we will provide a remote URL with the
git remotecommand.
git remote add origin https://github.com/[YOUR USERNAME]/reponame.git
- This tells
gitthat you are adding a remote location to store copies of the repo. Theoriginpart is the label that we are giving to the provided URL. We could call it anything we want, butoriginis the convention for the first one. - Now that you have a remote repo url you can start to do the
pushandpullcommands.
# Modifying your Repo
- EVERY time you want to save your changes locally and then upload, use these same commands:
git status
git add -A
git commit -m "description of your changes"
git push -u origin main
2
3
4
git statuswill tell you if there are files that have been updatedgit add -Awill add all modified files to the staging area to be saved in the repo.git commitactually makes the staged files part of the current code base.git push origin maintakes themainbranch and uploads it to the remote location calledorigin.